Blog Archives
Side to Side Knitted Cardigan
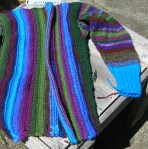
At last I am wearing my creation. Although with all the work and effort I am a little dissatisfied with the end result. I really do believe that I enjoy the process far better than the results. Funny ‘eh!
I know that there are things I would change, for example one sleeve is slightly longer than the other and the same goes for the front bands which I knitted in moss stitch. I think if I knitted the front bands with a slightly smaller needle then I would not get the “drag or pull” on the front. The reason the sleeve is longer is that I knitted one sleeve separately because I wanted to be sure I had enough of the different yarn choices included in it. I should have transferred the knitted sleeve stitches again as I added it to the last side. Instead I just joined it on with a three needle cast off. Experiments….that’s what this is all about.
The cardigan is lovely and warm and I love the colours. I used two yarns that I would not use again or better still I should have used doubled, they were to thin on their own. I love the moss stitch collar front bands BUT not the way it drags downwards. On my next one I will change this part of the design and only use the moss stitch for part of the collar and front.
I look forward to the next one or even two !
The many yarns that I used in this project : Cascade 220 Heathers and Plain. Chunky Mochi by Crystal Palace Yarns. Ella Rae Classic. Patons Classic Wool. Ultra Alpaca from Berroco. Tekapo Pure New Zealand Wool by Ashford.
Have you knitted anything similar? do you have any helpful suggestions?
De-Stashing Yarn A Knitted Project
My latests de-stashing project is a knitted cardigan using various odd balls of yarn. I used to buy yarn one ball at a time, I would see something great and think OH! goody what can I make with one ball from this gorgeous colour. Also it was affordable BUT not very economical or smart. Nevertheless I have a few balls to use! so begins my side to side knitted cardigan. I have admired other knitted side to side projects that I have found on Ravelry and thought surely I can do this too ! I have knitted from the top down, making a sweater with Barbara Walker’s helpful guidance. So I felt sure I could use a little help from Debbie Bliss to make my side to side cardigan. This is it so far…
I am surrounded by these colours in my world…the greens of the garden, the blues from flowers, sea and sky and the purples from the flowers in our garden.

Are you inspired by your surroundings ? what have you made ? would you like to share ?
Free Tutorial On Knitting And Felting A Small Decorated Purse
January 2011 More Knitting and Felting from Woolbrain
This year I would like to share a little more of how I make the things I
do so for my first item I have chosen my felted change purse. This, of
course, is not its only use as it can be used to carry an i Pod or cell
phone, cosmetics, knitting paraphernalia, guitar picks and strings or
woodwind instrument reeds. Perhaps the most popular item to place inside
is a gift card for a friend or colleague therefore giving two gifts in
one! Each purse can be personalized to suit the recipient.
How to make a knitted and felted purse with a zip closure.
The body of the purse is knitted either flat or in a round with a yarn
that is 100% wool that can be felted. The felting process is quite simple
and involves your washing machine and some laundry that needs a good hot
wash. I always place my felting items in an old pillow case and fasten the
end with an elastic band. Load the washing machine with the laundry and
filled pillowcase, don’t forget to add the soap and make sure it is on the hottest wash cycle then set the timer for ten minutes.
Using rubber gloves, remove the pillowcase and take out the purse to gauge
the felting. Some yarns take longer than others to felt so setting the
clock for ten minutes helps achieve a perfect piece. Experience will make
this task easier and quicker. The trick is to not make the purse too small
by leaving it in the hot water for too long!!
Once the felting is to your liking remove from the washing machine and let the washing cycle continue with the laundry. Rinse the purse in warm water and re-shape it as necessary.
Let it air dry on a flat surface, making sure it keeps its shape. Avoid a
rack or ridged surface as this can leave an imprint on the purse.
When the purse is dry, hand sew in a colour co-ordinated zip using two
strands of strong buttonhole thread. Now is the time to decorate the
outside, if you wish to do so. Choose a suitable cotton lining; I have
several fabric scraps from which to choose as only a small amount is
needed. Measure the purse and add about a quarter inch seam allowance plus
a little more for the top edge. This extra seam allowance allows the
fabric to stretch around the corners at each end of the zip. Cotton
fabric has a little give in it and so this works quite well however
t-shirt fabric works very well and because it has more stretch, does not
require the extra seam allowance at the top edge.
If you require an inside pocket, add this before sewing up the side seams.
A bottom seam can be avoided by folding the fabric along this edge thus
making a long rectangular shape. Adjust the lining to fit the purse and hand
stitch it in place, just above the zip stitching making sure that your
stitches do not show on the outside of your purse.
Ta Dah – your purse!
Although this picture shows the flowers on the table at this point they SHOULD be securely sewn to the outside of your purse.
I hope this helps those of you who would like to make your designer purses
for carrying small items from cell phones to jewellery. They are lots of
fun to make and give as gifts. Adding beads and trims will make each one a
designer original.
Calculating A Sale Price
The lighter evenings are here now and making me stay up longer to knit! I am having fun making knitted shawls of all shapes and sizes. I do, of course, have a stash of yarns from which to choose. My goal is to use as many as I can BEFORE I buy any more! We will see how that goes!

Yarns are so addictive; they come in so-o-o many different colours and textures. I like to support my local weavers and spinners by buying their hand-spun and hand-dyed yarns. Hearabouts they usually have a sale twice a year but I really should use up my stash first!
The colours of these hand-crafted yarns are much more subtle and muted and I prefer these to the commercial dyes. I would like to learn how to dye yarns but for the moment, I shall support the local artisans.
Markets and craft venues abound and people are looking for that unique, reasonably-priced item. Oh, how I wish I found it easy to price my work. I so enjoy making things but pricing them is always a challenge. Some shoppers believe that if an item is hand made then it should be cheaper than a mass-produced one however, those who know a bit about making unique and beautiful hand-crafted items understand the amount of time involved in their creation.
I have been given a formula for pricing hand-crafted items:
Hours spent on a piece x Hourly wage = Labour
Cost of materials plus labour = At Cost
At cost x 2 = Wholesale price
Wholesale x 2 = Retail Price
One of my small knitted and felted pouches takes me about four hours to knit, felt, sew in the lining and zip plus embroider so using the formula above, it would cost $32 if I calculated my time at $8 per hour. Even though I receive positive feedback, unfortunately shoppers are willing to pay $16-20. I wonder sometimes if it is worth my while making these specialised items.
Another suggestion for calculating a price is:
Cost of materials x 3 = Selling Price
I am pleased to say that I have been accepted to sell my work at a local craft venue in the Fall and it has been suggested that I make shawls and bigger bags to add to my repertoire. My latest shawl, the Purple Petunia, took over six hours to make so the labour alone would be $48!!
In the meantime, I shall be very happy knitting and knitting and knitting then think about pricing later!! Maybe I will have a brainwave and reach a happy medium before the Fall!


